
My Quick Guide to Help You Get Your Website Into WordPress
Get your website into WordPress Fast
The goal of this guide is to get your coded website into WordPress in as little time as possible. It’s not meant to cover every single nuance and detail of WordPress. I wanted to create a quick overview of some of the major steps that go into creating your own WordPress theme. Let’s get to it!
Step 1: Install the Dang Thing
We can technically do this at any point, but it’s nice to get out of the way. If your web host has a one click install package for WordPress, use it. If not, you’re going to have to install it the old fashioned way. Go here – http://codex.wordpress.org/Installing_WordPress.
Step 2: Download a Naked WordPress Theme
What? Yeah, we need some boilerplate to get this bad boy going. I use Starkers by Viewport Industries. It’s a stripped down theme that includes all of the core theme files we’ll need for a fully functioning site. Neato.
How does a WordPress theme work?
WordPress divides its structure into several PHP files in which we place different parts of our HTML code into. When the user visits the site, WordPress will re-assemble all of the parts and then send them as a single HTML page.
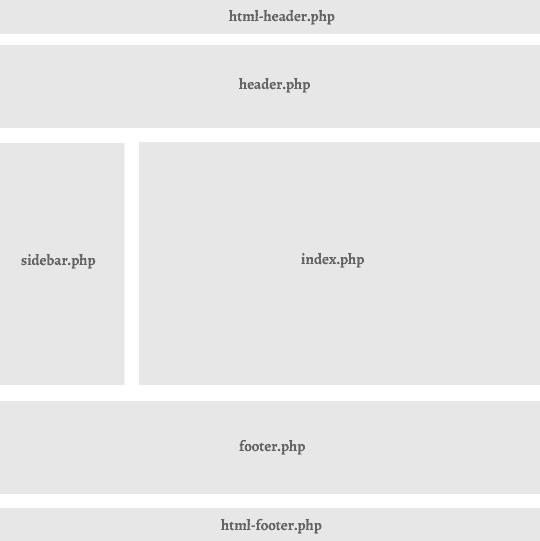
WordPress Theme Files:
- parts > shared (folder)
- header.php – Contains all of the content you you want to appear at the top of your site (navigation, logo, etc.)
- footer.php – Contains the content you want to appear at the bottom of your site. (social networking, contact, additional links, etc.)
- html-header.php – Contains the non-content related header HTML (javascript, css, doctype, title tags, meta, etc)
- html-footer.php – Contains the non-content related footer HTML (additional javascript, closing html tags)
- index.php – Main template which displays your posts.
- page.php – Default template for any page you create.
- single.php – Template for each blog post.
- archive.php – Template Used for viewing posts by date and author.
- category.php – Template Used for viewing post by category.
- comments.php – Called at the bottom of single.php which enables users to comment on a post.
- functions.php – Used to edit core functions of WordPress without having to edit any core files.
- search.php – Displays search results.
- 404.php – Displays when your user visits a page that doesn’t exist.
- style.css – Styles for your theme.
Just a side note: Starkers separates the header and footer differently than many other themes. Generally, themes just have the header.php and footer.php templates without the additional “html-” version. You can do it either way, but I find it easier to have them divided. If I know I need to edit a component related to the actual design of the site, I go to the non “html-” file. If I need to add scripts or modify css, I go to the html-header/footer file.
Step 3: Paste your HTML into the correct .php files
Next, we need to go through each template and wrap the existing WordPress tags with our own code.
html-header.php
Pretty straight forward. If you have scripts, css or any additional code, add them to the <head> tag just as they are in your original file. You may have additional wrapper DIVs that you want to include elsewhere as well.

header.php
This file will most likely contain your logo and your site’s primary navigation..

If you plan on using WordPress menus, you’ll need to go into your theme’s functions.php file and remove the comment from this code.
// register_nav_menus(array('primary' => 'Primary Navigation'));
You can use this tag to insert your menu on a page.
<?php wp_nav_menu( array( 'container_class' => 'menu-header', 'theme_location' => 'primary' ) ); ?>
Lastly, you will have to create a menu in the WordPress dashboard and designate it as your primary navigation.
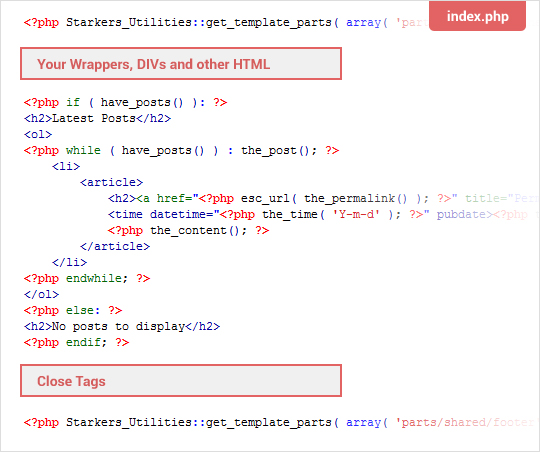
index.php, single.php, page.php, 404.php, archive.php,category.php and search.php
All of these files have almost identical steps to create minus any additional customization you want to add. This is where the bulk of our HTML will go. Put any containers that wrap your content here. Place the post loop code (<?php if (have_posts… within the region you have designated for your primary content. The code will be slightly different for each template, but the general principle is the same.
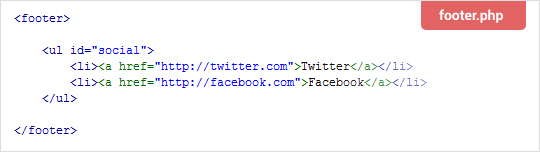
footer.php
Just like our header.php, we put any footer content HTML in this template. It could be social networking links, a short bio, copyright info, whatever you have in your footer.
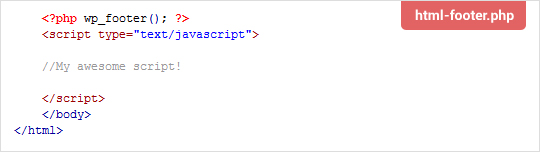
html-footer.php
To close out the site, we have our html-footer. I put my ending html and body tags here as well as any scripts I need to run at the end of the page.
Conclusion
Hopefully this gave you a nice quick intro into some of the steps that it takes to get your site into WordPress. I would love to cover what each loop/tag is doing and go over details on each template, but this post was meant to be a quickie. If you have any comments or critiques, please e-mail them to me or hit me up on twitter at @calebmcg.